Quickest, cheapest, least wasteful way to store fresh corn on the cob … using nature’s storage bags ;)

Our first summer on the farm we got overwhelmed with all the preserving we had to do all at once!!  Below is a post from our Facebook page a little later that year where I tried a few new tricks to save time and money while keeping our food for the year as fresh as possible.

I’ve been doing this for 3 years now and get perfect results every time 🙂
Enjoy!

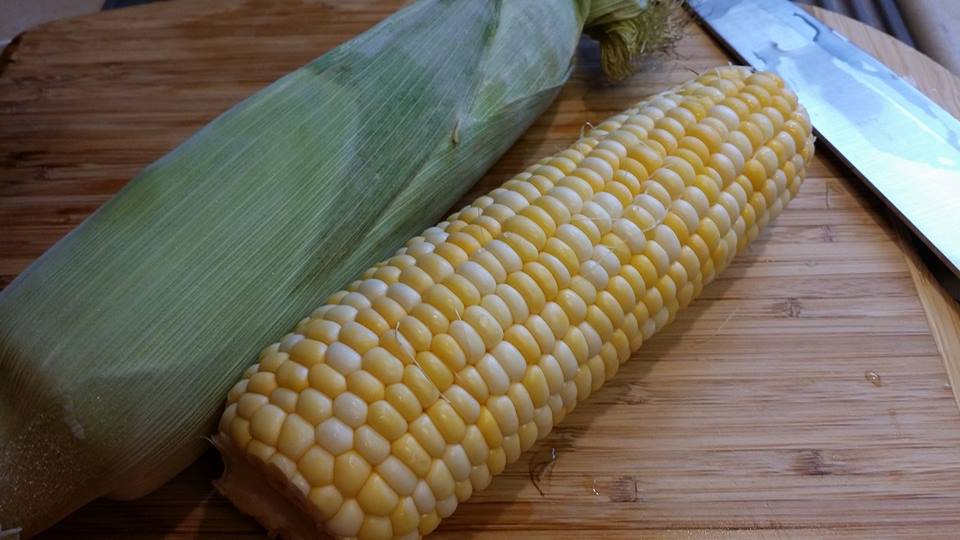
11 month old corn – still fresh and yummy!

May 2014

I’m all about efficiency. What’s the fastest, cheapest, least wasteful way to complete a task while maintaining the highest quality possible?

I’ve seen many ways to store corn but they all looked like way too much work! Last year I put my corn in the freezer without doing anything to it. The husk and fibers kept it safe from freezer burn and drying out.

Tonight I pulled out our last two ears from last year. They still taste like they were just picked!
Above is a picture of the two ears. I peeled one to show you what they look like after a year of freezing.

Easy homemade cream of anything sauce … no can opener needed ;)


Ingredients

1Cup of the broth
2Tbs butter
2Tbs flour
Salt and pepper to taste
1/4tsp dill (optional – but really makes it extra yummy)
Heavy cream (optional)
Melt the butter on med/low heat and whisk in the flour.  Let it cook for about 2min. 
Add in ½ of the broth while continuing to whisk, be careful because it will bubble up.  It will clump up initially but continue to whisk and it will get creamy and thicken up.  Once you have removed all the lumps, add the rest of the broth and whisk until it is at the desired thickness.  Whisk in the dill and CAREFULLY taste the sauce (it will be hot!).  Add salt and pepper to taste.  Finally, whisk in a splash (about ¼ cup) of cream for a richer flavor.

How to avoid food waste – leftover upgrade night!!

Last night I made a bone in roast that left us with lots of leftover meat.  It was a prime candidate for leftover upgrade night! 

Everyone loved the leftovers more than the initial meal so I’m sharing the recipe!

Here is how I did it…

How to make the flavorful broth:


In morning before work, I took the bone from last night’s dinner and put it in a crock pot with potatoes, carrots, celery, garlic and onion. I then added salt, pepper, paprika, tumeric and Italian herbs (about half a tsp each) and filled the pot with water.  I set the pot to Low and left for work. 

When we got home the house smells incredible!!   

I then turned the broth into a cream sauce, added in the veggies and leftover meat and we had a fresh meal using last night’s dinner!  Here is how to make the cream sauce


How I completed the leftover upgrade:

I tossed the meat into the cream sauce to heat it up (still on low/med heat).  I then plated the veggies next to the meat and spooned over the sauce. 

It was DELICIOUS … all the plates where completely cleaned and we are officially out of leftovers 🙂

The annual January “to do” list …

How January’s to do list will save us over $2,480 this year and stock the pantry!

Every January I have a routine that helps maximize our resources and improves the odds for the rest of the year’s success. This action list saves us an average $200/month and increases our quality of living. Here is how:


1. Review the monthly expenses
Do you know where your money goes every month? We have a list (by day of the month) that shows exactly what gets taken out of our checking account. I go down that list and call those companies one by one to see what new deals they have to offer. The monthly savings are small but they add up quickly. This year I saved $206.77 a month (over $2,480 this year!!).  Here is an example of this year’s savings.

Day of the month
Account
Monthly Amount saved
1
Gas/Food
 $                  34.02
1
Netflix
 $                    5.32
1
Insurance
 $                  37.30
1
Internet
 $                    4.46
1
Cell phones
 $                  45.30
8
Rewards credit card
 $                  78.60
12
Water
 $                        –  
20
Student loan
 $                        –  
21
Electricity
 $                        –  
30
Trash
 $                    1.76
Total
 $                206.77
2. Plan in the fun new farm projects
Every year we add a few new things to the farm. Last year we added more fruit trees, more goats, more meat chickens and turkeys. This year we will add a bee hive, ducks, more baby goats and possibly lambs.

Our turkey additions in 2014.

3. Plan the garden
Removing veggies that didn’t work for us last year and replacing them with new ones. Increasing plants for veggies that we consumed quickly and reducing plants for veggies we clearly weren’t eating. Identifying the sister plants to maximize production and plotting out the garden. This helps us identify the right time to start seeds.

This was no where near enough green beans for us last year.  We will triple our plants for 2015!!

4. Build seed starter pots
Recycling newspapers into little starter pots is a great way to start some vegetables.

Mini seed pots using newspaper.

5. Start some seeds and add to the small indoor garden
There are quite a few vegetables that will need to be started before January is over due to their long transplant lead time. For example I have already started some onions and celery to be planted outdoors this spring. I also keep a small indoor garden that I add to every January. I move these pots outdoors after the last day of frost so we can get our windows back in the spring!

This is a very zoomed in picture of some onions that were starting to bulb in mid February last year!

Light and fluffy natural yeast sandwich bread

Natural yeast sandwich bread

This is my go to sandwich bread recipe 2 times a week!

Ingredients:
2 3/4 C flour + 1 1/4 C flour

2 tsp salt
1 C warm milk
2 Tb unsalted butter, melted
3 Tb honey
1/2 Cup natural yeast 
(more info on natural yeast can be found here )

1.  Mix 2 3/4 C of the flour and the salt in the bowl of a standing mixer fitted with a dough hook.  Mix the milk, butter, and honey in separate bowl.  Pour mixture into the 1/2 cup of natural yeast and mix until all the ingredients are well incorporated.  Turn the machine on low and add the liquid.  When the dough comes together, increase the speed to medium and mix for 5 minutes.  If the dough is still sticking to the sides of the bowl, add the remaining flour, one 1/8 cup at a time until the dough no longer sticks (you might not use all of the flour – it all depends on the humidity level in your home at the time).  Continue to mix until the dough is smooth and satiny, about 5 more minutes.
2.  Form dough into a ball, place in lightly oiled bowl, cover and allow to rise until double, (usually overnight in a warm place).  Punch out the air and form into a loaf. Place in a greased loaf pan, seam side down, cover and allow to rise until double, about 2 hours.
3.  Bake at 350°F for 35-40 minutes until golden brown all over and internal temperature is 180°F.  Remove bread from the pan, transfer to a wire rack and cool for at least 15 min before slicing.

Sweet peach candy fruit rolls – only one ingredient!

Ingredients:
Peaches … yep that’s it!!

The secret is to roast the peaches to release their natural sugars before dehydrating them.  Here is how to do it:

  1. Preheat oven to 375.  
  2. Slice peaches in half and remove pit.  Place peach halves pit side up in a glass baking dish.  Bake for 15min.  
  3. Switch the oven to broil.  Move the peaches under the broiler to roast for another 10 min (monitor peaches so they don’t burn – just looking for a light browning.)
  4. Carefully remove the roasted peaches from the oven and let rest for 10 min.  (The pit cavity might fill with peach juices 
  5. Puree the peaches in a food processor or blender until smooth.  
  6. Spread the puree onto a dehydrator tray that has the fruit leather liner (smaller holes so the puree will not fall through).  use an offset spatula or the back of a spoon to smooth out the puree into an even layer (about 1/4 inch in thickness). 
  7. Set the dehydrator to 140°F and allow the fruit to dry for 8 to 10 hours.
  8. Peel the fruit leather off of the tray and slice long strips with a pizza cutter.
  9. Roll strips and place in an airtight container for storage.

Fire roasted tomatoes and easy tomato paste

Roasted Tomatoes

Roasting vegetables and fruit is a great way to bring out their naturally rich flavors.  Roasting tomatoes before adding them to a sauce or hot dish will intensify the flavors and take that sauce to a new level.  Here are three ways to roast tomatoes, and how to make a tomato paste from the roasted tomatoes. 


1 – Grill them…  Place the tomato right on the grate or in a grill basket.  When the tomato skin gets slightly charred flip the tomato to the opposite side and repeat.  This method will give you the most flavor and will add a slight smokiness to the tomato.
2 – Broil them …  Arrange the tomatoes in a single layer on a cast iron pan or heavy cookie sheet.  Place the pan directly under the broiling flames or heating element.  Keep a close eye on them because this will only take a few minutes.  When the first side is slightly charred flip the tomatoes and repeat.
3- Sear them … heat a heavy duty skillet or dutch oven to medium high heat.  Once the pan is hot add medium sized tomatoes.  Toss the tomatoes around with a spoon until desired char level is reached on the tomato’s skin.
Quick and easy fire roasted tomato paste
This paste uses the sear method mentioned above.  
  • After the tomatoes have reached the desired char level turn down the heat to medium.  
  • Use a potato masher to smash each tomato.  
  • Add a pinch of salt and stir the tomatoes until the desired consistency is reached.  
  • Add 1/8 cup of cold water and stir for a few seconds – then remove the pan from the heat.  Stir the paste to incorporate all the “flavor” on the bottom of the pan.  

This paste can be used right away, canned or stored in the freezer (ice cube trays are a great way to freeze them).

*Note: I am a participant of the Amazon.com associates program.  This is an affiliate advertising program designed to provide a means for sites to earn advertising fees by advertising and linking to amazon.com.  I have personally purchased or researched all of the products linked and will not suggest a product otherwise.  By purchasing through these links you support this Mini Slice of Farm blog without any extra cost to you and allow us to continue posting great content for you.  Thank you for your support!! 

Bone broth – liquid gold fountain of youth

I recently posted a picture on our Facebook page of a large pot of bone broth and received lots of questions.   Here are a few answers.

Bone broth is a nutrient, mineral and collagen rich broth that has a long list of health and beauty benefits.  To name a few – it aids in joint health, digestion,  building the immune system and is great for hair, skin and nails.  A cup a day in cooking or just to sip warm out of a mug is recommended.

Bone broth with rosemary and pink salt

Here is how I make mine.  (Note: you can use any kind of roasted bones for this broth.  I’ve tried it with beef, lamb and turkey as well)

Ingredients:

  • Roasted chicken (bones must be roasted for optimum benefits and taste)
  • Apple cider vinegar
  • Veggies (I use onions, carrots, celery, and garlic)
  • Bay leaves
  • Pepper corns
  • Salt
  • Chicken feet (cleaned, skinned and declawed, this is optional but they significantly increase the collagen)

Instructions:

  1. Roast a chicken for 75min at 350°F with salt/ pepper and whatever else we want to spice it with for dinner (last night I used it for onion chicken). 
  2. Pull off all the meat for dinner and put the bones in a large pot. Cover with cold water and 2 Tbls of apple cider vinegar and let it sit for 20 min. 
  3. While waiting prepare the veggies (I use onions, carrots, celery, and garlic). 
  4. Add veggies and throw in some bay leaves, pepper corns and salt. 
  5. If you also have the cleaned chicken feet throw them in there too (I know it sounds weird but the collagen boost is worth it!!). 
  6. Fill the pot with cool water and simmer on low for 12-24 hrs.  *Update* I now only use the crackpot for this recipe as it produces a richer more flavorful broth.  I start it on high for 6 hours and then let it run overnight on low for at least another 10hrs.
Large pot of bone broth that has been simmering for 16hrs 

After the broth is done cooking let cool and strain.  You can freeze, can and refrigerate this broth.  Consume one cup a day in cooking or just sip warm out of a mug.  Flavor with herbs, spices and salt/pepper when sipping it or using it in cooking.

Cheers to yummy health!

Farmer J’s guacamole perfection

It’s not taco nights on the farm without Farmer J’s yummy guacamole dip.  When he makes this for guests I always hear the same thing “no thanks, I’m not a guacamole fan”.  When they are convinced to take just one bite the entire bowl is suddenly empty lol

You will need:
2 ripe avocados
1 cup diced tomatoes (medium size)
1/2 cup chopped cilantro
1/2 cup finely diced red onion
Juice of 1 lime
Salt to taste
Potato masher

Using a knife slice all the way around the long edge of the avocados and twist the to halves appart.  Remove the pit and scoop out the avocado meat into a large bowl.   Add cilantro,  lime and salt then mash into a creamy consistency.   Add tomatoes and onion and stir.  Taste for salt and season as needed.

Note: If you like a little heat stir in a diced jalapeño.

So yummy!

Super easy homemade nut butter

**To Pin this recipe for later use the “Pin it” button at the end of the instruction section**

Here is what you will need.

• Food processor or blender
• 2 cups unsalted roasted peanuts (or any other nut – almonds, cashews,  and hazelnuts all work well)
• 2 Tbls raw honey
• Pinch of salt (optional – can add more or omit to taste)

Put roasted nuts in the food processor and pulse until nuts are in small chuncks.  Add honey and salt then puree until smooth.

Yeah – I couldn’t believe it was that easy either!!  Enjoy 🙂

^^Click here to pin the recipe for later^^