Help control the CRAZINESS with Routine Charts for Children

As  many of you know I’ve had many fruitful careers that I have loved and learned from.  Over the past several years my full time professional role can best be described as “Efficiency Expert” (as well as mom, wife, farm owner and blogger!) .  I’ve used many of the techniques I learned on the job in our home and on the farm as well.  They have helped streamline activities/chores and help tame the CRAZINESS we call life!  
I’ve shared our menu and activity calendar on Facebook last week and got great feedback and questions.  I’m still working on creating a free download for you but thought I’d share something a little easier to upload while I’m working on the family calendar uploads!!
Last year we added these three routine charts and they helped tremendously!!!  
Morning Routine Chart
The morning routine happens as soon as the kiddos wake up.  They are always ready before we have to leave in the morning so we get extra time to chat and have a relaxing drive to school!

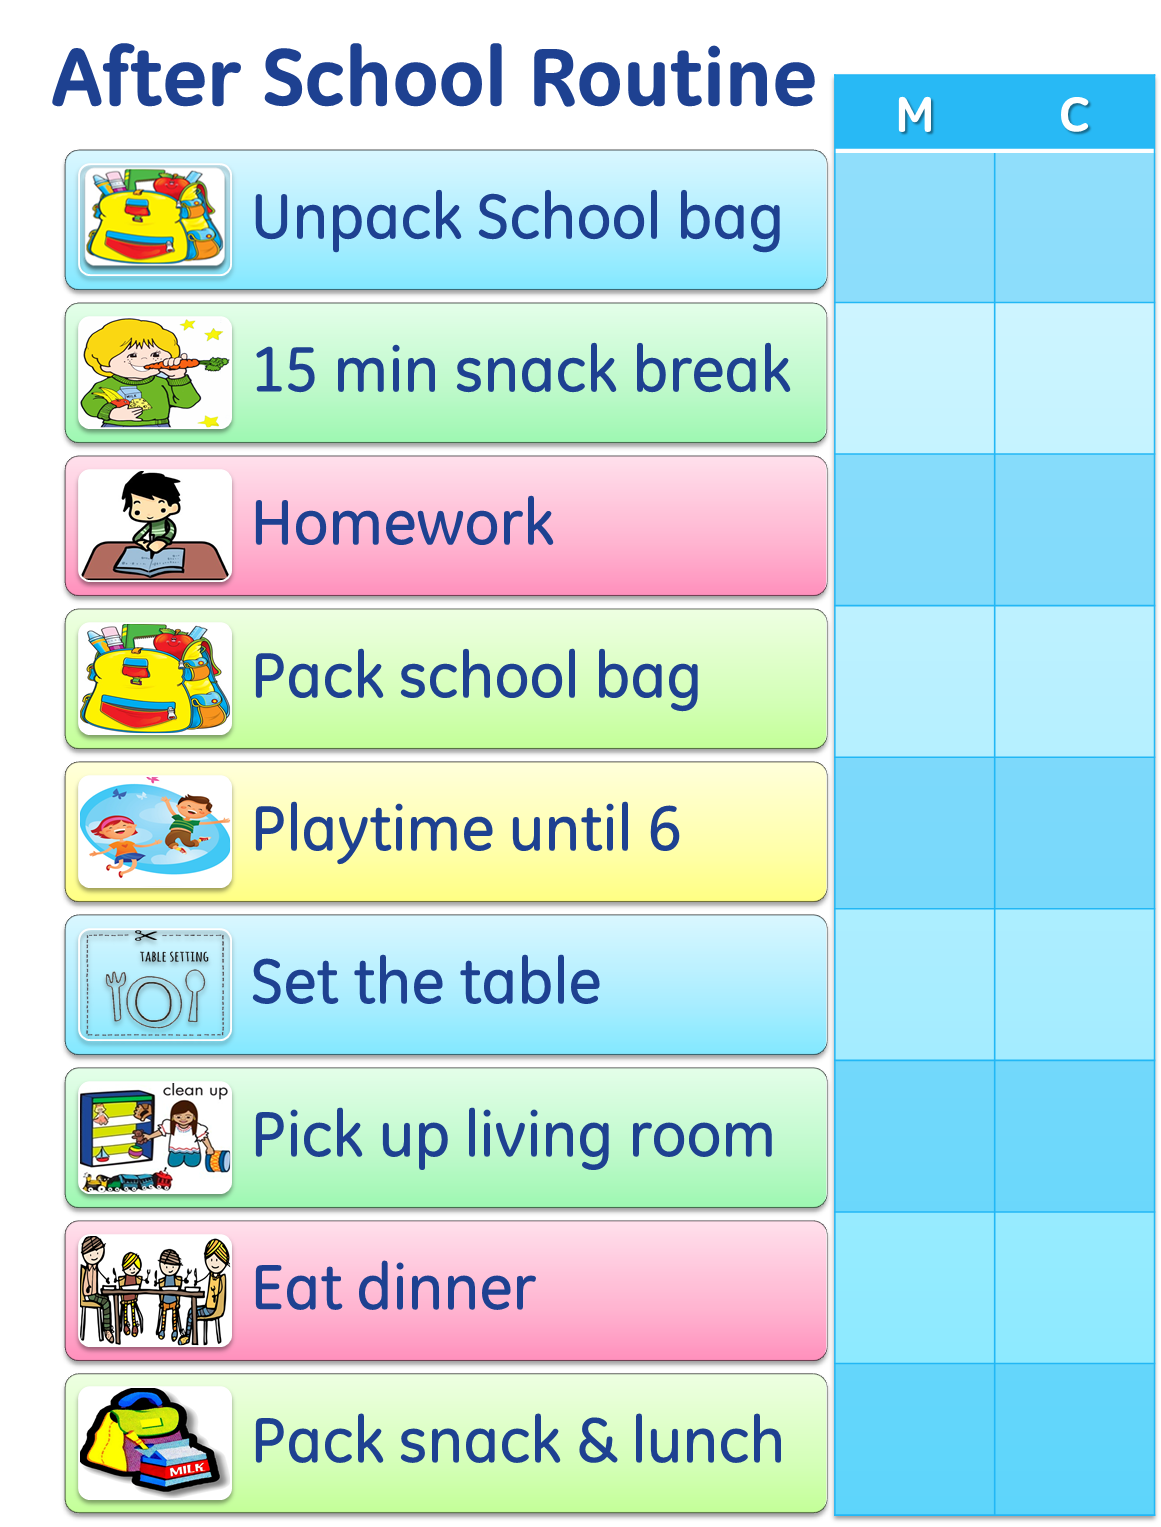
After School Routine Chart
The After school routine happens as soon as they get home from school.  We have sports and activities some nights after school so we usually substitute the “Play time” section for that activity.  This has eliminated the gross lunch containers we used to find in the mornings when packing their lunch.  We also know that they are all ready for the morning with a smooth sendoff.  A bonus side effect of this routine has been learning personal responsibility and contributing to an organized living space! 
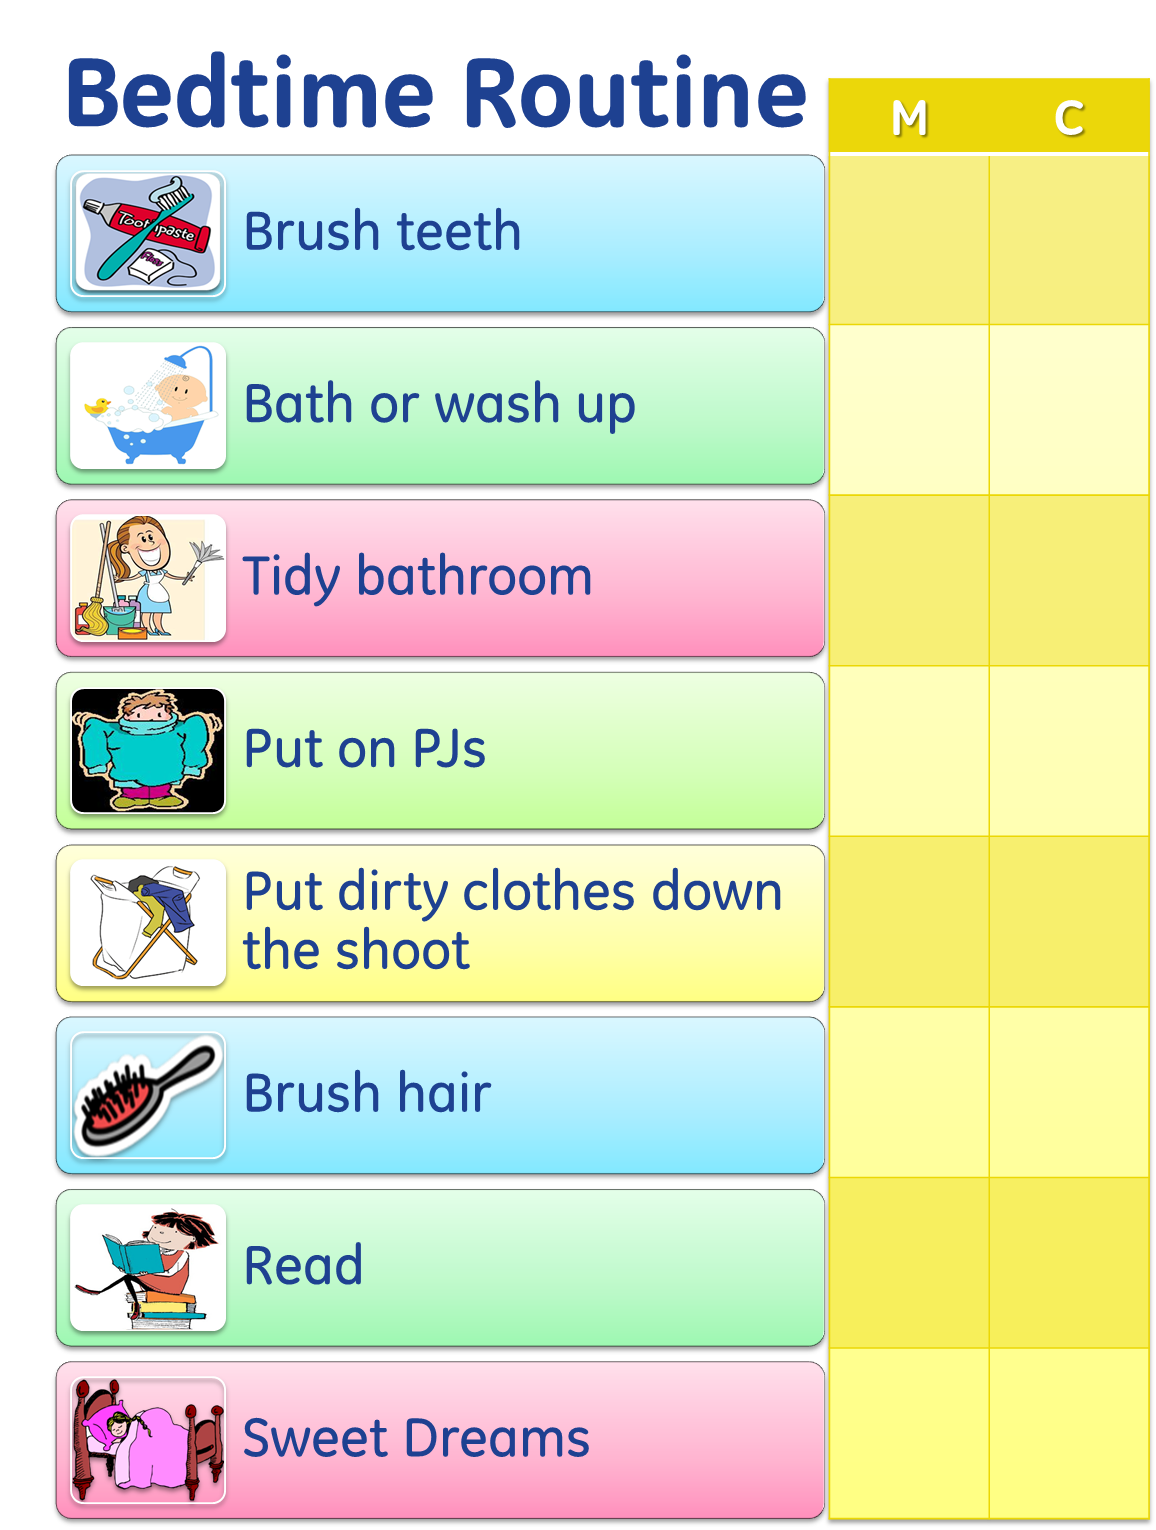
Bedtime Routine Chart

The Bedtime routine happens after dinner.  Typically they are excited to read a fun new book so they usually do a great job at this checklist to earn it (although we have had to push on some nights – especially when first introduced)!

Hope this helps tame the crazy in your home like it did ours.  Please leave comments bellow with your great “how we tamed the crazy” solutions below!  We can learn from each other – sharing is caring hahaha 🙂

How to cook rice in a blanket!!

Growing up we always LOVED to see a pot wrapped up in a blanket in the dining room … it meant we were going to a party with yummy food!!  This method is great if you need to cook your food on your way to a potluck or if you need to run out for a few hours but need food ready when you get home.  It will keep your food HOT for up to 3hrs.  As an added bonus you are using very little energy.

You can do this with plain rice (adding 1 Tbls of water per cup of rice) or follow my recipe below.
*The full steps are also in the video at the bottom of this post!!*  Enjoy 🙂

Ingredients:

You will also need:
  • Large paper bag
  • One thin tightly woven blanket (a doubled over sheet will also work)
  • One thick blanket
Instructions: 
  1. Bring pot up to medium low heat and add oil.
  2. Add Onion, salt and pepper and saute on medium heat until translucent.
  3. Turn heat to high and add orzo stirring until it turns golden brown (don’t walk away, this happens quickly)
  4. Have water ready to pour in as soon as orzo gets light brown (it burns quickly so 30 seconds could burn it!)
  5. Bring water to boil (use a small spoon to test water for salt and adjust if needed – be careful it’s hot!)
  6. Add rice and bring back to boil 
  7. Cover and put into paper bag, then wrap the bag closed (see video)
  8. Wrap with thin blanket, then the thick blanket
  9. Set aside for at least one hour
  10. Unwrap and fluff rice with fork (Again, being careful it’s HOT!)


*Note: I am a participant of the Amazon.com associates program.  This is an affiliate advertising program designed to provide a means for sites to earn advertising fees by advertising and linking to amazon.com.  I have personally purchased or researched all of the products linked and will not suggest a product otherwise.  By purchasing through these links you support this Mini Slice of Farm blog without any extra cost to you and allow us to continue posting great content for you.  Thank you for your support!!

Lentil soup and financial security

In early 1990 my father decided to open his own business.  It was a small grocery store with a two bedroom apartment on top for us to live in.  I didn’t know it back then but our average income was about $400/month.  When I found that out as an adult I was blown away!!  How could a family of 4 survive on so little?!?!  And how did I not know??  Our table was always full of nutritious food.  We always had nice warm clothes and a spotless house.  We didn’t want for anything … it just didn’t make sense how we could have so much on so little.


Then I really thought about it.  Mom was a grocery shopping, coupon clipping, bargain finding queen.  Standing at the register with her as a little girl I remember she always paid in cash.  She shopped for fresh seasonal ingredients and supplemented lentils and beans for protein a few times a week.  She bought whole chickens and showed me how to break them down to the more expensively packaged “boneless skinless” pieces, how to use every part of the chicken for stock/broth, and how that can make several meals.  She always cooked and never let a drop go to waste.  She would do leftover upgrades and leftover buffets often.  

Lentil soup was a big staple in my childhood and as an adult it brings back great comfort on cold winter days.  It tastes extra special knowing it was one of the many meals that helped build a strong financial foundation for our family.  The recipe below will yield about 10 servings for less than $0.77/serving!!   

Here is my mamma’s yummy Lentil soup recipe… Enjoy 🙂


Ingredients:

  • 2 & 1/2 cup red lintels 
  • 1 medium onion chopped
  • 2 large carrots shredded 
  • 3 Tbls olive oil
  • 1 Tsp cumin 
  • 1/4 Tsp cayenne pepper
  • 6 & 1/2 cups of water (or broth … learn how to make it here)
  • About 1 & 1/2 teaspoon salt (to taste)
  • Sumac (optional) 

Instructions:

  1. Rinse lintels with water and drain (at least twice). 
  2. Sauté onion and carrots in olive oil on med-low heat until translucent (not caramelized, about 3-5min).
  3. Stir in lintels and cumin and stir around to bring out the flavors for about 3 min.
  4. Add the water, and cayenne pepper then cook over medium heat for 30 min.
  5. Add the salt to taste (and more water if its too thick) then cook for another 5min.  
  6. The soup will be ready to eat at this point.  
  7. To make it creamy, a recommended (but optional) step is to purée with an Hand Blender.
  8. To serve, ladle into bowls (optional – sprinkle a little sumac on top for extra flavor)
*Note: I am a participant of the Amazon.com associates program.  This is an affiliate advertising program designed to provide a means for sites to earn advertising fees by advertising and linking to amazon.com.  I have personally purchased or researched all of the products linked and will not suggest a product otherwise.  By purchasing through these links you support this Mini Slice of Farm blog without any extra cost to you and allow us to continue posting great content for you.  Thank you for your support!!

Quickest, cheapest, least wasteful way to store fresh corn on the cob … using nature’s storage bags ;)

Our first summer on the farm we got overwhelmed with all the preserving we had to do all at once!!  Below is a post from our Facebook page a little later that year where I tried a few new tricks to save time and money while keeping our food for the year as fresh as possible.

I’ve been doing this for 3 years now and get perfect results every time 🙂
Enjoy!

11 month old corn – still fresh and yummy!

May 2014

I’m all about efficiency. What’s the fastest, cheapest, least wasteful way to complete a task while maintaining the highest quality possible?

I’ve seen many ways to store corn but they all looked like way too much work! Last year I put my corn in the freezer without doing anything to it. The husk and fibers kept it safe from freezer burn and drying out.

Tonight I pulled out our last two ears from last year. They still taste like they were just picked!
Above is a picture of the two ears. I peeled one to show you what they look like after a year of freezing.

Fire roasted tomatoes and easy tomato paste

Roasted Tomatoes

Roasting vegetables and fruit is a great way to bring out their naturally rich flavors.  Roasting tomatoes before adding them to a sauce or hot dish will intensify the flavors and take that sauce to a new level.  Here are three ways to roast tomatoes, and how to make a tomato paste from the roasted tomatoes. 


1 – Grill them…  Place the tomato right on the grate or in a grill basket.  When the tomato skin gets slightly charred flip the tomato to the opposite side and repeat.  This method will give you the most flavor and will add a slight smokiness to the tomato.
2 – Broil them …  Arrange the tomatoes in a single layer on a cast iron pan or heavy cookie sheet.  Place the pan directly under the broiling flames or heating element.  Keep a close eye on them because this will only take a few minutes.  When the first side is slightly charred flip the tomatoes and repeat.
3- Sear them … heat a heavy duty skillet or dutch oven to medium high heat.  Once the pan is hot add medium sized tomatoes.  Toss the tomatoes around with a spoon until desired char level is reached on the tomato’s skin.
Quick and easy fire roasted tomato paste
This paste uses the sear method mentioned above.  
  • After the tomatoes have reached the desired char level turn down the heat to medium.  
  • Use a potato masher to smash each tomato.  
  • Add a pinch of salt and stir the tomatoes until the desired consistency is reached.  
  • Add 1/8 cup of cold water and stir for a few seconds – then remove the pan from the heat.  Stir the paste to incorporate all the “flavor” on the bottom of the pan.  

This paste can be used right away, canned or stored in the freezer (ice cube trays are a great way to freeze them).

*Note: I am a participant of the Amazon.com associates program.  This is an affiliate advertising program designed to provide a means for sites to earn advertising fees by advertising and linking to amazon.com.  I have personally purchased or researched all of the products linked and will not suggest a product otherwise.  By purchasing through these links you support this Mini Slice of Farm blog without any extra cost to you and allow us to continue posting great content for you.  Thank you for your support!! 

How to ferment and save seeds

Seed fermenting 101

Last year I fermented some seeds as an experiment.  This year we planted those seeds and we’re BLOWN AWAY!  The seeds had a 100% germination rate – yes, every single one sprouted and produced a very healthy strong and beautiful plant!  Here is why, what and how to ferment.

*other great resources are at the bottom of this article*

Why ferment?
Fermenting wet seeds will remove the gel coating from the seed that prevent it from germinating.  It is also helps you weed out the non viable seeds.  Saving your own seeds will also strengthen the seeds year over year and get the seeds better acclimated to your environment.

What to ferment?
Wet seeds (such as tomato or squash) are the only candidates for fermentation.  Seeds that do not originate in a wet environment will naturally dry out for use in the following year.
Choose the best fruit from the strongest plant.  That will give you similar plants the following year.

How to ferment?
1) Select fruit from a healthy strong plant.  The fruit/veggie you select should be the best one on your plant – no imperfections if possible.

2)  Scoop or squeeze out the pulp and seeds.

3)  Place pulp and seeds in a jar.  Add filtered water, the ratio is one part pulp and seeds to three parts water.

4)  Place in a warm place with a loose lid.  The lid is only there to keep bugs out and the smell in.

5)  After a 5-7 days the viable seeds will sink and the bad seeds and most of the pulp will float.   Pour off the bad seeds and pulp that rose to the top (and any white film that may have formed).

6)  Rinse the remaining viable seeds .

7)  Place seeds on a flour sack cloth or paper towel to dry compleatly. (1-2 days)

8)  Store seeds in dark paper envelope labeled with the seed name/type and year.  Store in a cool dry place for next season.

Other great resources:
Seed to seed (book)
I will add more to this list as I find them!

*Note: I am a participant of the Amazon.com associates program.  This is an affiliate advertising program designed to provide a means for sites to earn advertising fees by advertising and linking to amazon.com.  I have personally purchased or researched all of the products linked and will not suggest a product otherwise.  By purchasing through these links you support this Mini Slice of Farm blog without any extra cost to you and allow us to continue posting great content for you.  Thank you for your support!!

Clean your microwave using lemon scraps!

Clean your microwave the easy, chemical free way!

We use LOTS of lemons around here!!  A great way to use leftover lemon rinds is to clean the microwave.

Fill a heat resistant glass container with water and the lemon rind.  Microwave on high for 8 min.  Leave the microwave door closed for another 2 minutes giving the steam time to work the baked on gunk loose.  Wipe down with clean towel … it’ll come right off!!

Before:

After:

Once you try it, it’ll be the only way you clean your microwave … at least that’s what happened at our house 🙂