Always a delicious potluck hit … Cucumber tomato salad??

**To Pin this for later use the “Pin it” button at the end of the instruction section**

Subscribe to our YouTube channel and follow us on social media!! 

 https://www.youtube.com/channel/UCvWq9EZRYx6MB6ty5m44c5w                                      


“Wow this is delicious, can I drink the juice?”

A few years ago we had a potluck get-together.  I wanted to bring a healthy option that everyone would actually eat.  I thought my FAVORITE side dish, mom’s cucumber tomato salad, would be perfect!  She made this salad next to a traditional recipe that came from my great grandmother that I like to call “flip over rice lasagna” (recipe coming soon).  

The reactions we received on the potluck side dish were very surprising.  Everyone initially went through the line and took a small spoonful to try (partly because they felt like they should have SOMETHING healthy on that plate lol).  After the first taste the comments were:

“Wait, what did you say was in this?” 
“Wow, this is delicious, can I drink the juice”
“Can I take the rest?”  


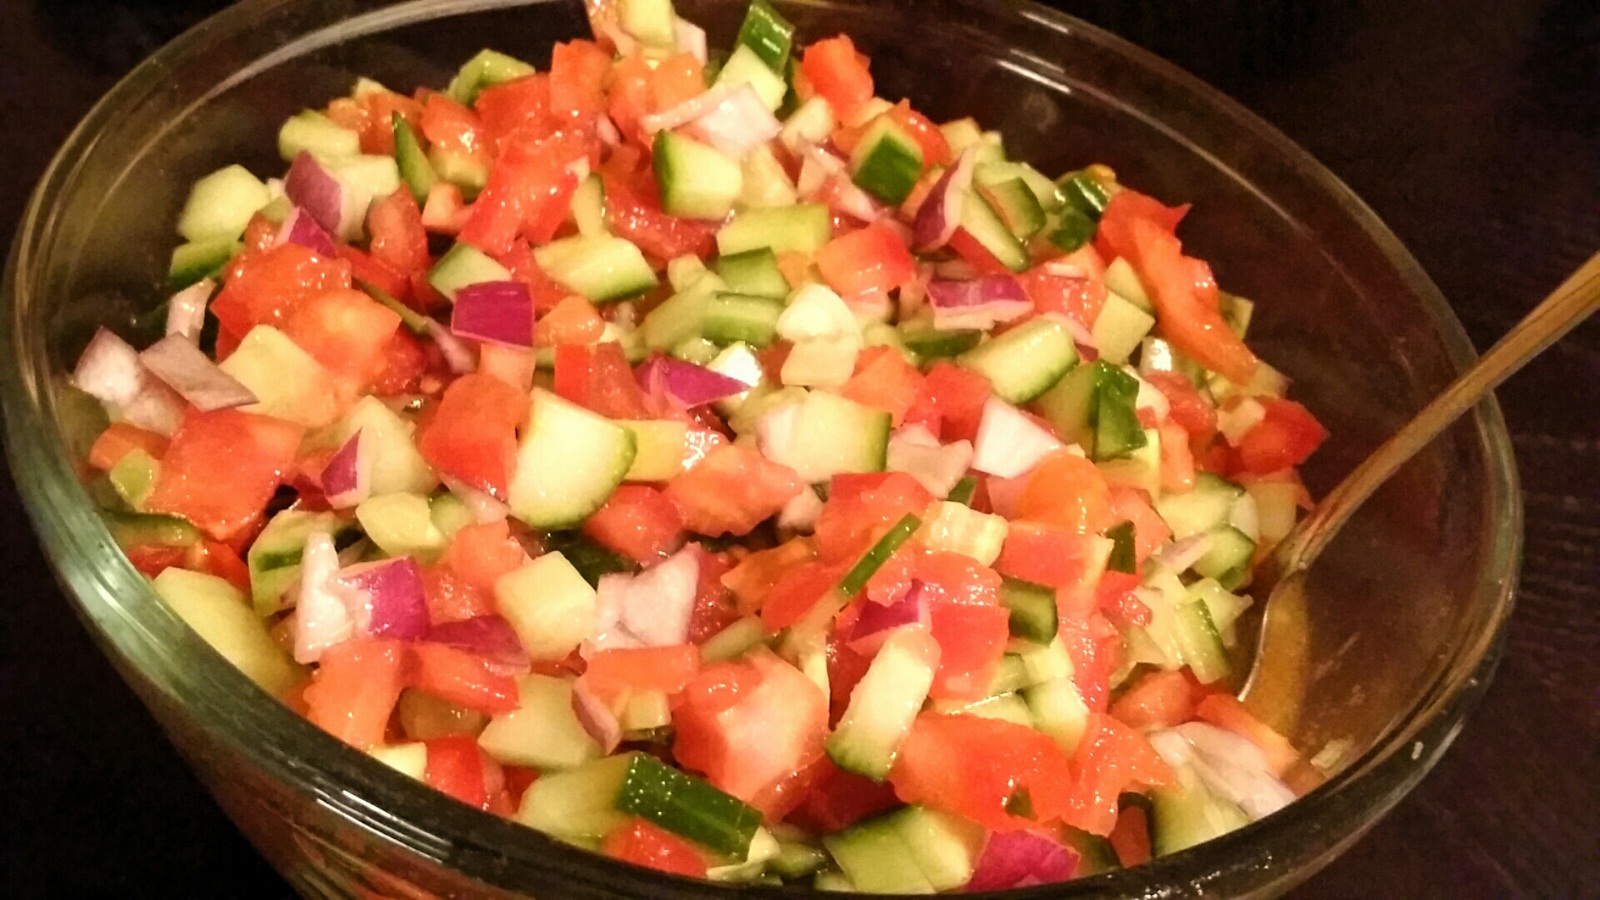
This salad is now the most requested side dish (and recipe) for us to bring to events.  
Hope you love it as much as we do 🙂 

Ingredients:

Instructions:

  1. Dice the cucumber, tomatoes and onion into 1/4 inch pieces and put into a large bowl.
  2. Lightly drizzle the olive oil, vinegar, and lemon all over the top.  Make sure to evenly distribute it all over the veggies.
  3. Evenly sprinkle the salt all over the veggies and wet ingredients.  
  4. Toss to incorporate all the ingredients together.
  5. Taste for added salt if needed – season to taste.
  6. Enjoy!
https://www.pinterest.com/pin/7881368076364751/
^^To pin this recipe for later click here^^

*Note: I am a participant of the Amazon.com associates program.  This is an affiliate advertising program designed to provide a means for sites to earn advertising fees by advertising and linking to amazon.com.  I have personally purchased or researched all of the products linked and will not suggest a product otherwise.  By purchasing through these links you support this Mini Slice of Farm blog without any extra cost to you and allow us to continue posting great content for you.  Thank you for your support!!

Lentil soup and financial security

In early 1990 my father decided to open his own business.  It was a small grocery store with a two bedroom apartment on top for us to live in.  I didn’t know it back then but our average income was about $400/month.  When I found that out as an adult I was blown away!!  How could a family of 4 survive on so little?!?!  And how did I not know??  Our table was always full of nutritious food.  We always had nice warm clothes and a spotless house.  We didn’t want for anything … it just didn’t make sense how we could have so much on so little.


Then I really thought about it.  Mom was a grocery shopping, coupon clipping, bargain finding queen.  Standing at the register with her as a little girl I remember she always paid in cash.  She shopped for fresh seasonal ingredients and supplemented lentils and beans for protein a few times a week.  She bought whole chickens and showed me how to break them down to the more expensively packaged “boneless skinless” pieces, how to use every part of the chicken for stock/broth, and how that can make several meals.  She always cooked and never let a drop go to waste.  She would do leftover upgrades and leftover buffets often.  

Lentil soup was a big staple in my childhood and as an adult it brings back great comfort on cold winter days.  It tastes extra special knowing it was one of the many meals that helped build a strong financial foundation for our family.  The recipe below will yield about 10 servings for less than $0.77/serving!!   

Here is my mamma’s yummy Lentil soup recipe… Enjoy 🙂


Ingredients:

  • 2 & 1/2 cup red lintels 
  • 1 medium onion chopped
  • 2 large carrots shredded 
  • 3 Tbls olive oil
  • 1 Tsp cumin 
  • 1/4 Tsp cayenne pepper
  • 6 & 1/2 cups of water (or broth … learn how to make it here)
  • About 1 & 1/2 teaspoon salt (to taste)
  • Sumac (optional) 

Instructions:

  1. Rinse lintels with water and drain (at least twice). 
  2. Sauté onion and carrots in olive oil on med-low heat until translucent (not caramelized, about 3-5min).
  3. Stir in lintels and cumin and stir around to bring out the flavors for about 3 min.
  4. Add the water, and cayenne pepper then cook over medium heat for 30 min.
  5. Add the salt to taste (and more water if its too thick) then cook for another 5min.  
  6. The soup will be ready to eat at this point.  
  7. To make it creamy, a recommended (but optional) step is to purée with an Hand Blender.
  8. To serve, ladle into bowls (optional – sprinkle a little sumac on top for extra flavor)
*Note: I am a participant of the Amazon.com associates program.  This is an affiliate advertising program designed to provide a means for sites to earn advertising fees by advertising and linking to amazon.com.  I have personally purchased or researched all of the products linked and will not suggest a product otherwise.  By purchasing through these links you support this Mini Slice of Farm blog without any extra cost to you and allow us to continue posting great content for you.  Thank you for your support!!

How to make butter in less than 60 seconds

We had a little fun on our snow day yesterday and made some butter.  Here is how we did it 🙂


Ingredients:

  • Heavy whipping cream (you can make this with as little or as much as you like as long as the whisk can reach the cream to whip it)
  • Mixer

Instructions:

  1. Pour heavy cream into mixing bowl.
  2. Slowly bring the mixer to high speed (so it doesn’t splash everywhere)
  3. Let it go until the butter separates from the buttermilk (it will splatter, see video)
  4. Press out the liquid and drain.
  5. Rinse butter with sold water until water is clear.
  6. Press into a butterbell or container of your choice.


*Note: I am a participant of the Amazon.com associates program.  This is an affiliate advertising program designed to provide a means for sites to earn advertising fees by advertising and linking to amazon.com.  I have personally purchased or researched all of the products linked and will not suggest a product otherwise.  By purchasing through these links you support this Mini Slice of Farm blog without any extra cost to you and allow us to continue posting great content for you.  Thank you for your support!!


Quickest, cheapest, least wasteful way to store fresh corn on the cob … using nature’s storage bags ;)

Our first summer on the farm we got overwhelmed with all the preserving we had to do all at once!!  Below is a post from our Facebook page a little later that year where I tried a few new tricks to save time and money while keeping our food for the year as fresh as possible.

I’ve been doing this for 3 years now and get perfect results every time 🙂
Enjoy!

11 month old corn – still fresh and yummy!

May 2014

I’m all about efficiency. What’s the fastest, cheapest, least wasteful way to complete a task while maintaining the highest quality possible?

I’ve seen many ways to store corn but they all looked like way too much work! Last year I put my corn in the freezer without doing anything to it. The husk and fibers kept it safe from freezer burn and drying out.

Tonight I pulled out our last two ears from last year. They still taste like they were just picked!
Above is a picture of the two ears. I peeled one to show you what they look like after a year of freezing.

Easy homemade cream of anything sauce … no can opener needed ;)


Ingredients

1Cup of the broth
2Tbs butter
2Tbs flour
Salt and pepper to taste
1/4tsp dill (optional – but really makes it extra yummy)
Heavy cream (optional)
Melt the butter on med/low heat and whisk in the flour.  Let it cook for about 2min. 
Add in ½ of the broth while continuing to whisk, be careful because it will bubble up.  It will clump up initially but continue to whisk and it will get creamy and thicken up.  Once you have removed all the lumps, add the rest of the broth and whisk until it is at the desired thickness.  Whisk in the dill and CAREFULLY taste the sauce (it will be hot!).  Add salt and pepper to taste.  Finally, whisk in a splash (about ¼ cup) of cream for a richer flavor.

Sweet peach candy fruit rolls – only one ingredient!

Ingredients:
Peaches … yep that’s it!!

The secret is to roast the peaches to release their natural sugars before dehydrating them.  Here is how to do it:

  1. Preheat oven to 375.  
  2. Slice peaches in half and remove pit.  Place peach halves pit side up in a glass baking dish.  Bake for 15min.  
  3. Switch the oven to broil.  Move the peaches under the broiler to roast for another 10 min (monitor peaches so they don’t burn – just looking for a light browning.)
  4. Carefully remove the roasted peaches from the oven and let rest for 10 min.  (The pit cavity might fill with peach juices 
  5. Puree the peaches in a food processor or blender until smooth.  
  6. Spread the puree onto a dehydrator tray that has the fruit leather liner (smaller holes so the puree will not fall through).  use an offset spatula or the back of a spoon to smooth out the puree into an even layer (about 1/4 inch in thickness). 
  7. Set the dehydrator to 140°F and allow the fruit to dry for 8 to 10 hours.
  8. Peel the fruit leather off of the tray and slice long strips with a pizza cutter.
  9. Roll strips and place in an airtight container for storage.

Fire roasted tomatoes and easy tomato paste

Roasted Tomatoes

Roasting vegetables and fruit is a great way to bring out their naturally rich flavors.  Roasting tomatoes before adding them to a sauce or hot dish will intensify the flavors and take that sauce to a new level.  Here are three ways to roast tomatoes, and how to make a tomato paste from the roasted tomatoes. 


1 – Grill them…  Place the tomato right on the grate or in a grill basket.  When the tomato skin gets slightly charred flip the tomato to the opposite side and repeat.  This method will give you the most flavor and will add a slight smokiness to the tomato.
2 – Broil them …  Arrange the tomatoes in a single layer on a cast iron pan or heavy cookie sheet.  Place the pan directly under the broiling flames or heating element.  Keep a close eye on them because this will only take a few minutes.  When the first side is slightly charred flip the tomatoes and repeat.
3- Sear them … heat a heavy duty skillet or dutch oven to medium high heat.  Once the pan is hot add medium sized tomatoes.  Toss the tomatoes around with a spoon until desired char level is reached on the tomato’s skin.
Quick and easy fire roasted tomato paste
This paste uses the sear method mentioned above.  
  • After the tomatoes have reached the desired char level turn down the heat to medium.  
  • Use a potato masher to smash each tomato.  
  • Add a pinch of salt and stir the tomatoes until the desired consistency is reached.  
  • Add 1/8 cup of cold water and stir for a few seconds – then remove the pan from the heat.  Stir the paste to incorporate all the “flavor” on the bottom of the pan.  

This paste can be used right away, canned or stored in the freezer (ice cube trays are a great way to freeze them).

*Note: I am a participant of the Amazon.com associates program.  This is an affiliate advertising program designed to provide a means for sites to earn advertising fees by advertising and linking to amazon.com.  I have personally purchased or researched all of the products linked and will not suggest a product otherwise.  By purchasing through these links you support this Mini Slice of Farm blog without any extra cost to you and allow us to continue posting great content for you.  Thank you for your support!! 

Farmer J’s guacamole perfection

It’s not taco nights on the farm without Farmer J’s yummy guacamole dip.  When he makes this for guests I always hear the same thing “no thanks, I’m not a guacamole fan”.  When they are convinced to take just one bite the entire bowl is suddenly empty lol

You will need:
2 ripe avocados
1 cup diced tomatoes (medium size)
1/2 cup chopped cilantro
1/2 cup finely diced red onion
Juice of 1 lime
Salt to taste
Potato masher

Using a knife slice all the way around the long edge of the avocados and twist the to halves appart.  Remove the pit and scoop out the avocado meat into a large bowl.   Add cilantro,  lime and salt then mash into a creamy consistency.   Add tomatoes and onion and stir.  Taste for salt and season as needed.

Note: If you like a little heat stir in a diced jalapeño.

So yummy!

Super easy homemade nut butter

**To Pin this recipe for later use the “Pin it” button at the end of the instruction section**

Here is what you will need.

• Food processor or blender
• 2 cups unsalted roasted peanuts (or any other nut – almonds, cashews,  and hazelnuts all work well)
• 2 Tbls raw honey
• Pinch of salt (optional – can add more or omit to taste)

Put roasted nuts in the food processor and pulse until nuts are in small chuncks.  Add honey and salt then puree until smooth.

Yeah – I couldn’t believe it was that easy either!!  Enjoy 🙂

^^Click here to pin the recipe for later^^

Veggie lo mein with homemade noodles

Our Chinese NON-take out veggie lo mein was kicked up a notch with homemade noodles.

Here is the recipe:

Noodles:
1 Cup semolina flour
1 Cup all purpose flour
2 large eggs
1/2 teaspoon salt
Water (if needed to get the proper consistency)

Lo mein:
1 lb snow peas
2 cups of shredded cabbage
2 tablespoons freshly grated grated
4-5 cloves garlic chopped
3 tablespoons vegetable oil
2 tablespoons soy sauce
Bean sprouts (optional)
Sesame oil (optional)

To make the noodles mix the two cups of flour with the salt.  Add the eggs and knead into a dough.  If the dough is too dry add a little bit of water knead it in.

If you have a pasta roller run the noodles through the press on the highest setting 10 times, (folding over the noodle and running it through again).  Then decrease the setting by one notch and run the dough through again.  Repeat until you reach the desired thickness.   Then run the dough through the spaghetti cutter.

If you don’t have a pasta roller you can roll the noodles out using a rolling pin.  When you get the dough to the desired thickness flour the dough and roll it.  You can then cut the roll into thin disks and unroll it.   It will unroll into noodles.

Boil noodles until al dente.  (This will only take a few minutes so don’t walk away!)

For the lo mein:
Place a pan or wok on high heat.  In the hot pan or wok, add vegetable oil. It will smoke lightly.  Add the peas, and toss for 1 minute. Add the garlic and ginger then toss for 1 minute.  Add the rest of the vegetables, noodles, and soy sauce.  Toss for 2 minutes.  Quickly remove the mixture from the pan and place it in a serving dish.  Drizzle sesame oil over the hot lo mein for garnish.

This entire process took less than 20 minutes!!  Hope you love it as much as we did.